Create an Event
You must be logged in and have a club selected (or be a club manager/owner) to create an event. If you don't yet have a club, create one first: Create a Club.
To create an event, follow these steps:
Primary Steps
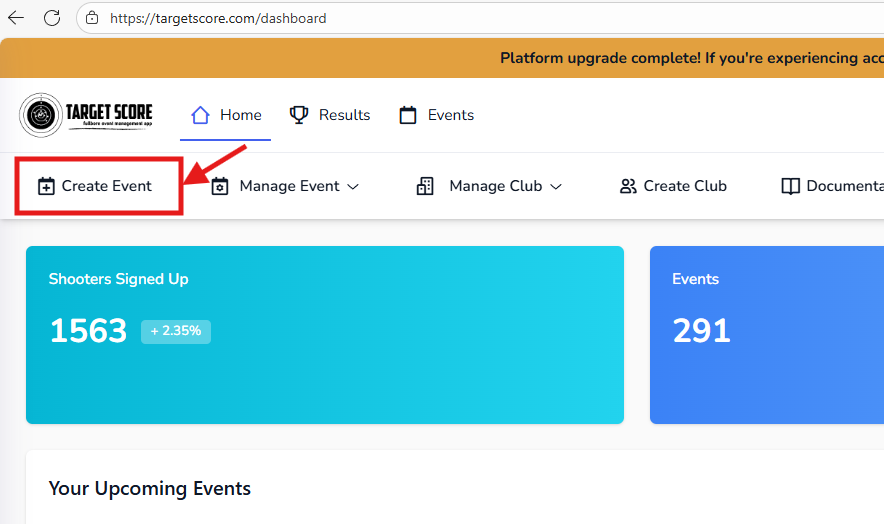
- Go to Create Event page.
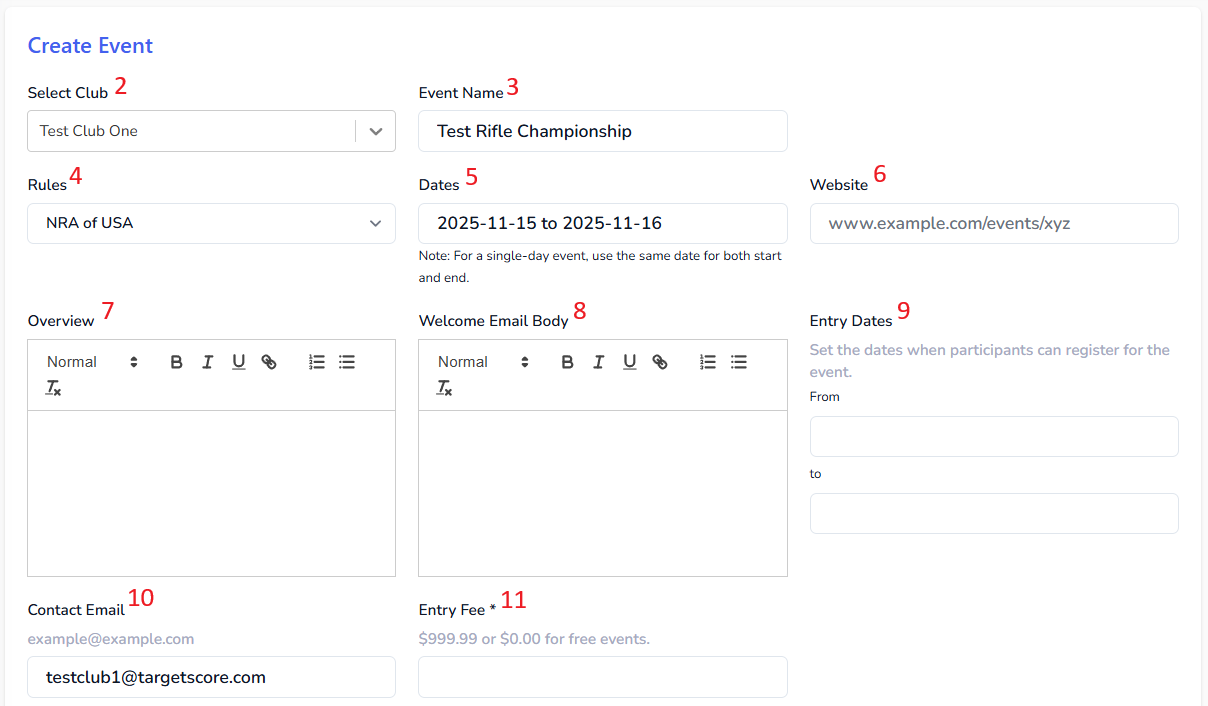
- If you manage multiple clubs, select the club for which you want to create the event from the dropdown.
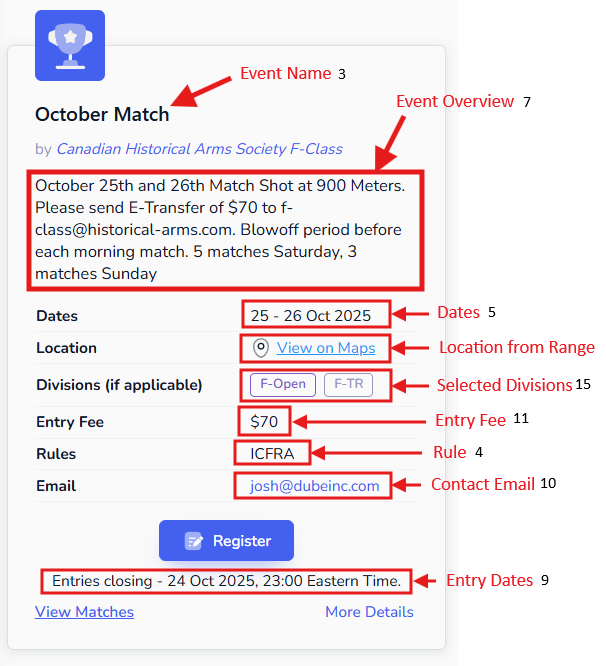
- Enter the event name.
- Select the rules from the dropdown. We currently support the following NRA Rules:
| Rule | Classifications | Highest Score | Tie Breaker |
|---|---|---|---|
| ICFRA | X, A, T, O | 5 | V |
| DCRA | MS, EX, SS, GS | 5 | V |
| NRA of USA | HM, MS, EX, SS, M, UC | 10 | X |
| NRA of UK | X, A, T, O | 5 | V |
| WI Fullbore Shooting Council | A, B, C, O | 5 | V |
| NRA of Australia | A, C, C, O | 5 | V |
| ISSF | MS, EX, TEX, SS, M, JR | 10 | X |
If you want to override the default classifications coming with the selected ruleset, you can override those under Manage Club > Club Divisions.
If your National or Regional governing body is not listed, please select the closest matching ruleset. You can also reach out to us at support@targetscore.com and we can work together to add it.
- Select the event dates. For a single-day event, select the same date for both start and end. For multi-day events, select the appropriate start and end dates.
- Provide the event-specific website (optional).
- Enter the event overview (optional). It will appear on the event page.
- Compose the welcome email body (optional). It will be sent to participants upon registration.
- Specify the entry dates. Entries will be allowed within this date range. Leave it blank if you want shooters to enter anytime without restrictions.
- Provide the contact email (defaults to the user email). It will appear on the event page for participants to reach out with questions.
- Set the entry fee. Enter 0.00 for free events. If you enter an entry fee and select Credit Card (Stripe) as the payment method, the event will be created as a product in the Credit Card processing portal for online payment processing.
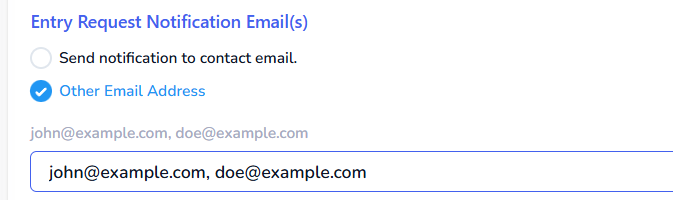
- Set the entry request notification email:
- Send notifications to the contact email provided above (#10).
- Enter other email address to notify or add multiple email addresses as comma-separated values to notify multiple people.
More Options
 This section is collapsed by default. Click on "+ More Options" to expand it.
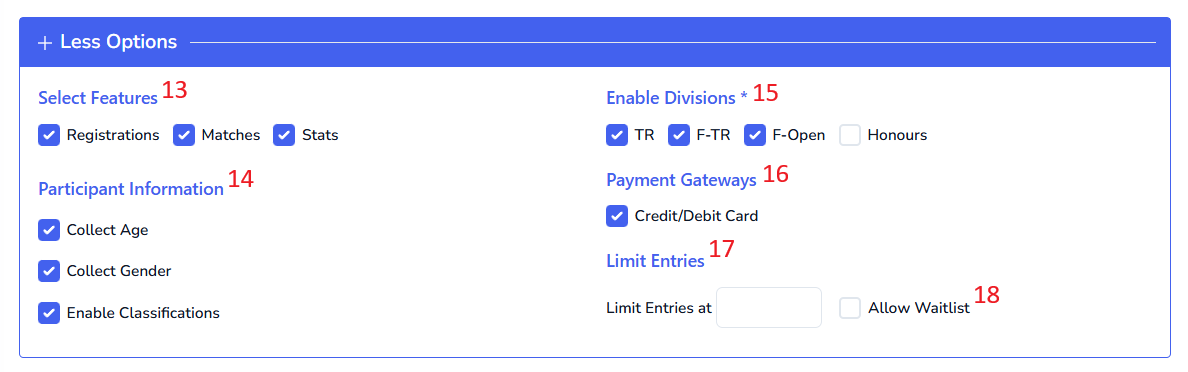
13. Select Features
All features are checked by default.
- Registration: Checked by default. Uncheck if you only want to use Target Score for publishing event information without managing participant registrations.
- Matches: Checked by default. Uncheck if you only want to publish event information without match details and stats.
- Stats: Checked by default. Uncheck if you do not want to manage or publish scores on Target Score.
Note that disabling Participants or Matches will also disable Stats. Stats can be turned off independently but cannot be enabled without Participants and Matches.
14. Participant Information
All options are checked by default. These options control mandatory data collection on the registration form.
- Collect Age: We collect age groups instead of date of birth for data security. Age groups are 25-64, 65+, 19-24, and Under 19. For custom age groups, create a Custom Entry Form and manually add participants to the appropriate User Category.
- Collect Gender: Collect participant's gender - Male, Female, or Others.
- Enable Classifications: Collect NRA-specific classification information. Uncheck if classifications do not apply to your discipline.
Most of the events collect this information for different aggregates and awards. If you don't need it, uncheck the options. If you want to collect additional information, create a Custom Entry Form and manually add participants to the appropriate User Category.
15. Enable Division
Divisions are based on the NRA Rules selected above. You can override these defaults under Manage Club > Club Divisions. Toggle applicable divisions for the event.
16. Payment Gateways
Configure Payment Gateways under Manage Club. Toggle the payment methods you want to allow for this event. All methods are checked by default.
- Stripe
- E-Transfer
- Cash
17. Limit Entries
Limit the number of entries. Once the number of participants reaches the specified limit, entries will be turned off automatically. When available spots are less than 10, a notification will appear under Register button.
18. Waitlist
Enable waitlist to allow participants to join a waitlist once the event reaches the entry limit. When a spot opens up, you can manually invite the participants from the waitlist to enter.
Additional Options
- Allow Target Score to collect donations during registration. This option adds a donation field on the Entries page when Credit Card is selected as the payment option. Donations will be transferred to Target Score from the Credit Card company.
- Hide the event and results from public listings. You will need to share the links yourself. Find the event link under Manage Club > Your Events.
- Agree to terms and conditions and privacy policy.
Finally, click the "Create" button at the bottom.
Preview
Below is the preview of Event tile and arrows repersents the name of the field and number of the item in the documentation above.